
Flare-On 7 — 10 Break
For your convenience, use the table of contents on the sidebar to navigate to different locations and skip parts that you are rather familiar with.
Initial Analysis
First Look at ./break
Looks like this challenge author decided to give us a break after all that hard work we’ve done so far. Neat! Jokes aside, this looks like the first troll out of many others this challenge authors created in this one. Anyway, let’s dig in.
$ file break
break: ELF 32-bit LSB executable, Intel 80386, version 1 (SYSV), dynamically linked, interpreter /lib/ld-linux.so.2, for GNU/Linux 2.6.32, BuildID[sha1]=1793c43108b544ef35f9814b0caafcf76210631c, stripped

$ ./break
welcome to the land of sunshine and rainbows!
as a reward for getting this far in FLARE-ON, we've decided to make this one soooper easy

please enter a password friend :) AAAAAAAAAAAAAAAAAAAAAAAAAAAAAAAAAAAAAAAA
sorry, but 'sorry i stole your input :)' is not correct
This one seems to be a stripped 32 bit ELF executable, and once it’s executed it simply requests for the password, probably performs some checks, and finally spits out whether the password is correct or not.
Notice that it says that 'sorry i stole your input :)' is not the correct password, even though we inserted a bunch of As. This is odd, and we should keep this in mind while analyzing this sample.
Opening the binary in our disassembler of choice, we can see a pretty straight forward main function.
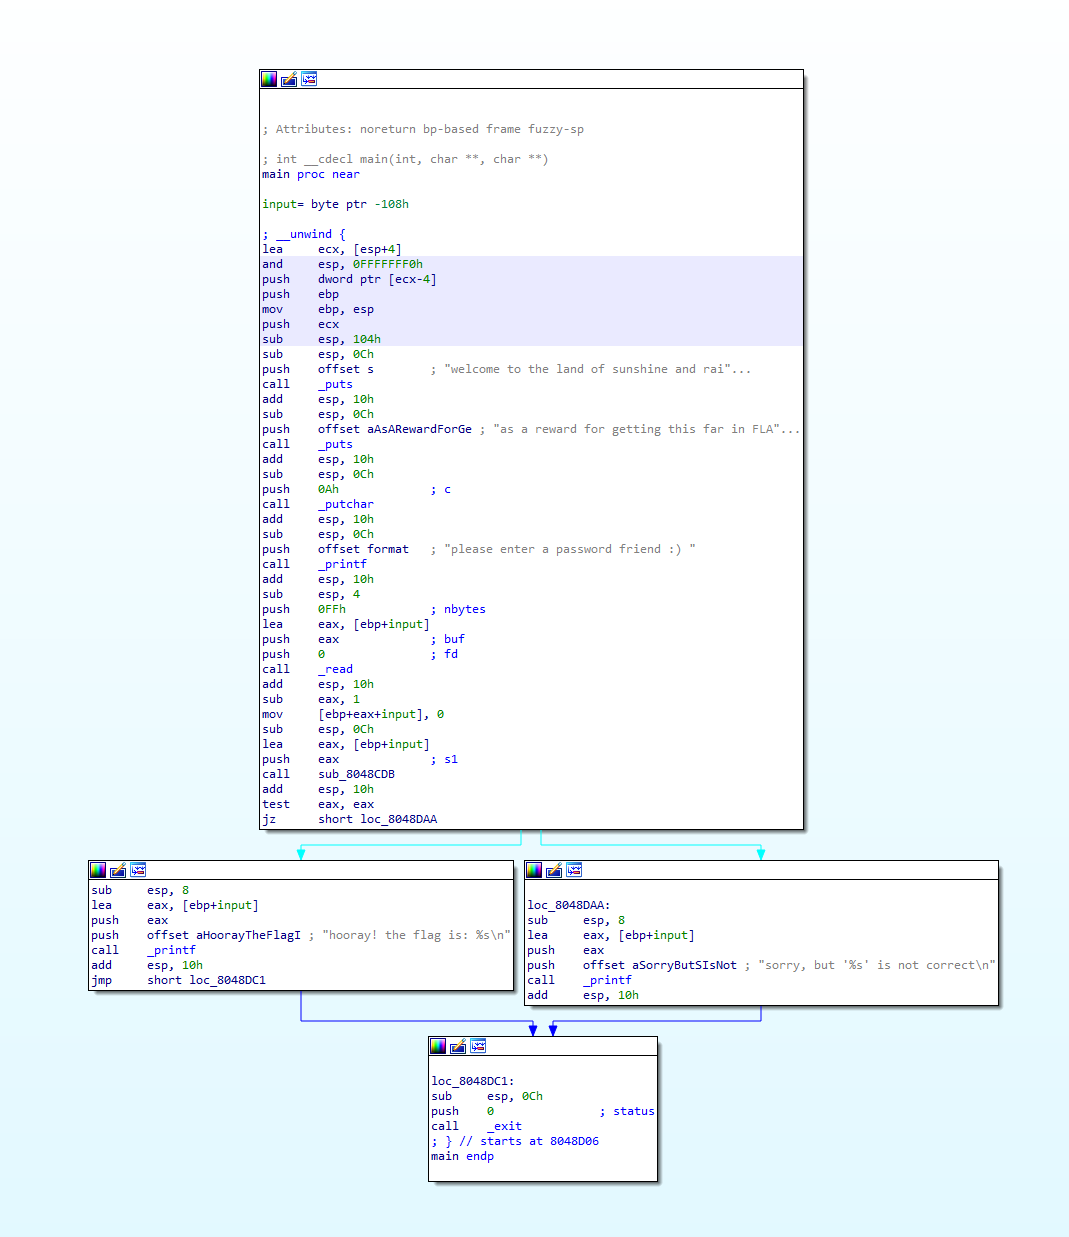
Looks like it prints out the welcome messages, then reads 255 bytes from STDIN, then passes the input buffer to a function at offset 08048CDB, and based on the return value, it’ll print the result. Seems easy. Too easy.
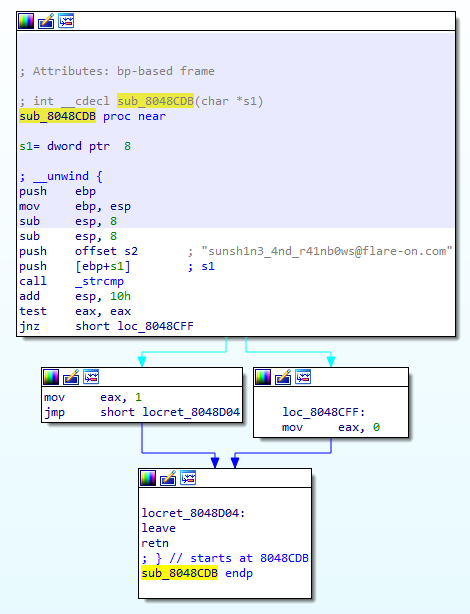
The input buffer seems to be compared with sunsh1n3_4nd_r41nb0ws@flare-on.com. Did we just solve this?
$ ./break
welcome to the land of sunshine and rainbows!
as a reward for getting this far in FLARE-ON, we've decided to make this one soooper easy

please enter a password friend :) sunsh1n3_4nd_r41nb0ws@flare-on.com
sorry, but 'sorry i stole your input :)' is not correct
Quick execution of the binary with this input shows that we didn’t, which makes quite a lot of sense since we’re dealing with level 10 here. As you can see in the input above, we did get the exact same message like before, even though our input was different. Our assumption now should be that there is some more code in this binary that’s executing besides what we see in the main function.
Initialization Code
If we think there’s some more code running than what we see in main, and we can’t debug the binary, a good place to start looking for more code being executed is the initialization routines. These routines include different types of constructors used by the binary, and they are executed before the program’s main.
We can find these functions by navigating to the entry point of the code, there we’ll see a call to ___libc_start_main. This function’s 4th parameter is a pointer to an init function, which is responsible for calling all the initialization routines the program contains. In our case, it’s located in 08056320.
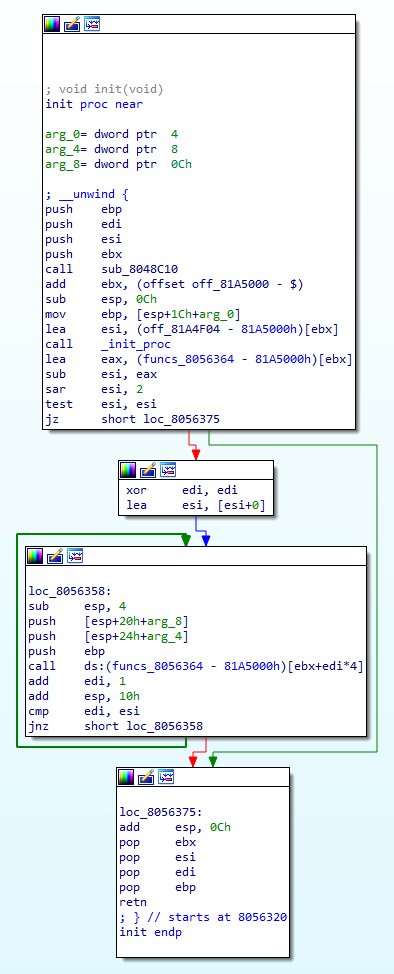
In this init function, we can see a loop that iterates over an array containing initialization routines pointers and calling each one of them. The array (located in 081A4EFC) contains 2 functions.
Skimming through those functions, our interest is piqued by the second one (08048FC5), which calls fork and exits the process if the call fails, which is not something you usually see in an initialization routine.

Understanding fork
fork duplicates the calling process by creating a new one and copying all the memory to it from the first one, which means the new process will be executing the next instruction in this function as do the original calling process. The way to differentiate between the calling process and the newly created one is by looking at the return code of fork. In the original calling process, the return value will be the PID of the new child process. In this case, the program will branch and call prctl with the option 0x59616d61 and the PID of the newly forked process. A quick google search for “prctl 0x59616d61” will reveal that this option is PR_SET_PTRACER and it means that the process sets its ptracer to be the new child process. This explains why we couldn’t connect a debugger to the binary - it already had a ptracer and a process in Linux can only have one at any given time. At this point, the original process (will be referred to as the parent process from now on) will sleep before continuing to execute, giving a chance to the child process to start its logic.
Child1 Analysis
In the newly forked process, the return value of fork will be 0. In this case, the program will not branch and will continue to execute the function at 080490C4, passing the parent PID as a parameter to it.

We’ll refer to this newly forked process as child1 from now on. The function at 0x080490C4 contains quite a lot of code, so let’s dig into that.
The first thing we notice, is that there are a lot of calls to a function at 0x0804BAE6.
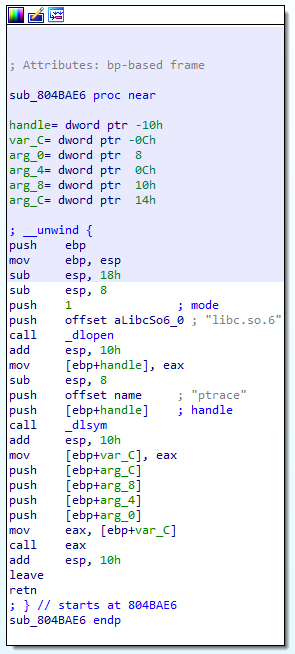
This function simply loads ptrace and passes its arguments to it. So we’ll refer to this function as ptrace from now on.
The first thing child1 does is to call ptrace with the parent’s PID as an argument, and the request of type 0x10.
push    0
push    0
push    [ebp+parent_pid]
push    10h
call    ptrace
A nice tip here, if you’re using IDA Pro, is to click the 10h constant and hit M on the keyboard, then you’ll be able to choose the right enumeration for this constant (__ptrace_request in our case) and this will show you the symbol name for this constant number (will work in the Decompiler as well). By doing that, we’ll get a more meaningful code.
push    0
push    0
push    [ebp+parent_pid]
push    PTRACE_ATTACH
call    ptrace
Now it’s very easy to see that child1 will attach to the parent using ptrace, which is to be expected based on the call to prctl we saw in the parent.
In case child1 fails to ptrace the parent (can happen if it’s already being ptraced), it will either kill the ptracer or quit the program altogether. Things start to get interesting when child1 does ptrace the parent.
From this point on, we’d like to look at the code in the order in which it’s being executed, so we’ll be jumping between processes and functions quite a lot. We’ll also refer to the function at 0080490C4 as child1_main for convenience.
The next thing that child1 does in child1_main is the following:
if ( ptrace(PTRACE_POKEDATA, parent_pid, (int)check_input, 0xB0F) == 0xFFFFFFFF )
        exit(0);
Based on the man page of ptrace, PTRACE_POKEDATA basically copies the word from the 4th argument to the address from the 3rd argument to the process which its PID we get in the 2nd parameter. This means that child1 will write 0xB0F to the start of the function check_input (based in 0x08048CDB) that we saw before. These bytes do not produce a valid x86 instruction, so it’ll cause the parent process to execute illegal code when it starts running again (remember that since we attached to the parent using ptrace, it’s now suspended until we’ll send some ptrace request that will cause the execution to resume.
This is followed by a call to the function at 0804A0B4 which looks quite similar to our initialization function.
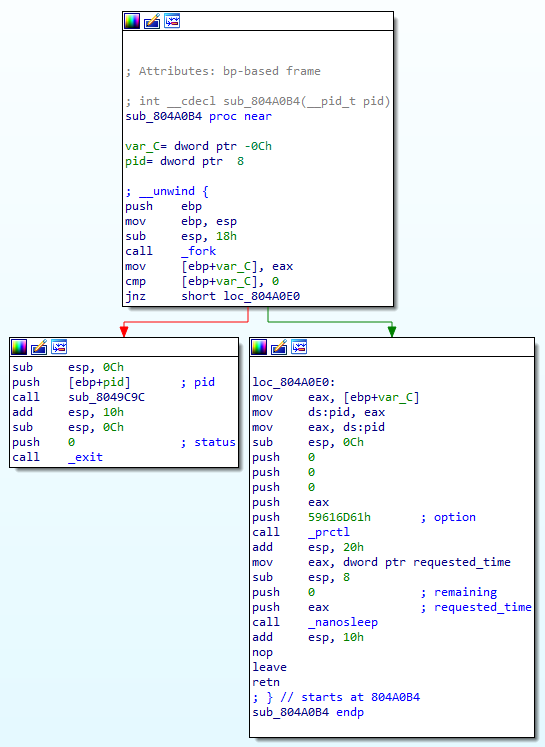
This function will fork again, make the forked process - child2 execute the code starting at 008049C9C (we’ll call this child2_main) and set child2 as the ptracer of child1. So we have parent that creates child1, and child1 which creates child2. And every child in this tree ptrace its parent so child1 ptrace parent and child2 ptrace child1.
Some of the readers will recognize this set of parent-child debugging techniques as “Nanomites”. It is a software protection technique that became popular thanks to the Armadillo protector. For further reading, we recommend the following posts:
We’ll get back to child2 later, for now, we stick to analyzing child1 which continues by doing the following:
ptrace(PTRACE_SYSEMU, parent_pid, 0, 0);
PTRACE_SYSEMU is a request to emulate the ptraced process' syscalls - every syscall the parent will make, child1 will get a trap signal and be able to control the values the parent will get back from it. At this point, child1 will call waitpid() in an infinite loop, to wait for signals from the parent process so let’s see what it’s up to.
Stage 1
Understanding Syscall Emulation
After returning from the initialization function, parent will execute its main starting with a call to puts() to print out the welcome message. Many glibc functions ultimately use Linux system calls in order to execute their logic on the system. So for example puts() will use the write system call in order to write to the desired file descriptor that the user-provided. Since glibc is open-source, you can go and look for yourself at the function code, and see which system call it invokes during its execution. Another option is to use strace on a tiny program that will call the glibc function (puts() for instance) which will let you know exactly what system calls are involved in the function of interest. Before we dive in, let’s make sure we remember how system calls work in x86. A system call is an int 0x80 instruction while the type of system call is being passed to the kernel using the eax register. For the write syscall eax should be set to 4 (you can find syscall constants based on architecture type here). Every syscall can also accept arguments, which are being passed in ebx, ecx, edx, esi, edi, ebp accordingly. This out of the way, now the execution goes back to child1 since parent made a syscall which sent a SIGTRAP to child1. After child1 called waitpid() and got a signal, it’ll check its type and in case of a SIGTRAP (that in this case is sent due to the syscall) it’ll do the following (from child1_main):
if ( (status & 0xFF00) >> 8 == SIGTRAP )
{
  ptrace(PTRACE_GETREGS, parent_pid, 0, (int)&v15);
This ptrace request will get the values of all the parent process registers into the 4th argument. Looking at the documentation we can see that it’s of type user_regs_struct, so let’s hit Y on that variable in IDA Pro and set v15 to be of that type, and also we’ll rename it to parent_regs. Now the code looks better.
if ( (status & 0xFF00) >> 8 == SIGTRAP ) // Trace trap
{
  ptrace(PTRACE_GETREGS, parent_pid, 0, (int)&parent_regs);
  last_instruction = ptrace(PTRACE_PEEKDATA, parent_pid, parent_regs.eip - 1, 0);// Read data
  if ( last_instruction == -1 )
    exit(0);
  if ( (unsigned __int8)last_instruction == 0xCC )// If software breakpoint
  {
    kill(parent_pid, SIGKILL);
    exit(0);
  }
  magic = 0x1337CAFE * (parent_regs.orig_eax ^ 0xDEADBEEF);
Next, child1 uses ptrace() yet again, this time with a request to PTRACE_PEEKDATA which will read a word from the address in the 3rd parameter in the parent. The address from which it reads is parent_regs.eip - 1 which means it’ll read the last instruction executed. In case it was 0xCC(int 3) it will kill the parent and exit. Otherwise, it will take the syscall type stored in eax and xor and multiply it with constant values to create a magic number that will be used to determine its next steps. Next in child1_main we see a bunch of if and switch statements that will execute the correct logic based on the original system call type. To understand what relevant code path will be taken in our write syscall case, we’ll do the math first.
Python> 0x1337CAFE * (4 ^ 0xDEADBEEF) & 0xffffffff # 4 == WRITE
0x7e85db2a
Then we can quickly search for this value to locate the correct code path within the function (you can either skim through the function manually or use Alt+I to search for this immediate value in IDA). This will bring us here:
case 0x7E85DB2A:
	size = parent_regs.edx;
	buf = malloc(parent_regs.edx);
	sub_804BBF8(parent_pid, parent_regs.ecx, buf, size);
	write(1, buf, size);
	parent_regs.eax = size;
	ptrace(13, parent_pid, 0, (int)&parent_regs);
	free(buf);
	break;
First, we’ll make the decompiled code look s bit better by renaming variables and applying the correct enum symbols. Since this code is fairly simple - let’s have a look at sub_804BBF8 to fully understand it. It accepts 4 arguments - the parent PID, ecx from of parent (which is the second argument for the system call - our buffer pointer in write, a pointer to the newly allocated buffer, and the size which we get from the 3rd argument of the write syscall. If we go to sub_804BBF8 and rename its arguments, we can quite easily understand what it’s doing.
for ( i = 0; i < size / 4; ++i )
{
  *new_buffer = ptrace(PTRACE_PEEKDATA, parent_pid, buffer, 0);
  buffer += 4;
  ++new_buffer;
}
result = (int *)(size % 4);
v8 = size % 4;
if ( size % 4 == 1 )
  v7 = 255;
if ( v8 == 2 )
  v7 = 0xFFFF;
if ( v8 == 3 )
  v7 = 0xFFFFFF;
if ( v8 )
{
  v5 = v7 & ptrace(PTRACE_PEEKDATA, parent_pid, buffer, 0) | ~v7 & *new_buffer;
  result = new_buffer;
  *new_buffer = v5;
}
return result;
Here child1 is using the ptrace request PTRACE_PEEKDATA to read data from parent, 4 bytes at a time from within the loop, and the remainder of the data after it. We can rename sub_804BBF8 to copy_from_pid so it’ll be easier to recognize later. Getting back to our case that handles the write syscall we can immediately tell that it simply emulates the write syscall for the parent - allocating a buffer for the string to be written, copying this string from the parent memory space, calling write(), and finally putting the number of written bytes into eax and setting the new state of the registers using the request PTRACE_SETREGS.
case 0x7E85DB2A:
	size = parent_regs.edx;
	buf = malloc(parent_regs.edx);
	copy_from_pid(parent_pid, parent_regs.ecx, (int *)buf, size);
	write(STDOUT_FILENO, buf, size);
	parent_regs.eax = size;
	ptrace(PTRACE_SETREGS, parent_pid, 0, (int)&parent_regs);
	free(buf);
	break;
Now we understand the concept of how child1 can emulate system calls for the parent and we’ll continue to look at the parent’s main.
After a few write system calls which child1 will simply emulate, we get to the first read(). Going back to our syscall table, we see that this one has the constant 3 in x86, so we’ll use that to get our magic value again.
Python> 0x1337CAFE * (3 ^ 0xDEADBEEF) & 0xffffffff # 3 == READ
0x91bda628
Which will bring us to this code (chil1_main):
else if ( magic == 0x91BDA628 )
{
  fgets(byte_81A56C0, 255, stdin);
  s = (char *)sub_804C438(0xB8);
  dword_81A57C0 = parent_regs.ecx;
  v3 = strlen(s);
  sub_804BB2D(parent_pid, parent_regs.ecx, (int *)s, v3);
  parent_regs.eax = strlen(s) + 1;
  ptrace(PTRACE_SETREGS, parent_pid, 0, (int)&parent_regs);
}
As you can see, the first action child1 takes here is also to emulate the read syscall for the parent using by calling fgets(). We’ll rename byte_81A56C0 to input_buffer since this is the buffer that’ll hold the user input. At this point, looks like child1 gets a string from sub_804C438 and stores the 2nd argument from the read syscall in dword_81A57C0 (from ecx); let’s call this the parent_input_buffer since this is where the parent expects to get the user input into. Finally, child1 calls sub_804BB2D, and returns the length of the string it got from sub_804C438 by setting eax and requesting PTRACE_SETREGS. In order to fully understand the logic here, we’ll have to examine the two unknown functions. Starting with sub_804BB2D:
for ( i = 0; i < a4 / 4; ++i )
  {
    ptrace(PTRACE_POKEDATA, a1, a2, *a3);
    a2 += 4;
    ++a3;
  }
  result = a4 % 4;
  v8 = a4 % 4;
  if ( a4 % 4 == 1 )
    v7 = 255;
  if ( v8 == 2 )
    v7 = 0xFFFF;
  if ( v8 == 3 )
    v7 = 0xFFFFFF;
  if ( v8 )
  {
    v5 = ptrace(PTRACE_PEEKDATA, a1, a2, 0);
    result = ptrace(PTRACE_POKEDATA, a1, a2, v5 & ~v7 | v7 & *a3);
  }
  return result;
It looks rather similar to a function we already analyzed - copy_from_pid, but the difference is the usage of PTRACE_POKEDATA instead of PTRACE_PEEKDATA which is used to write data instead of reading it. So this function writes data into the given PID, and thus we’ll rename it to copy_to_pid.
Now it becomes clear that child1 reads data from the user and stores it in its memory space in input_buffer, but what it returns to the parent is a completely different string which it gets from the function sub_804C438. If we paid close attention this far, we may already assume that the string it returns to the parent is ‘sorry i stole your input :)' due to the output we saw when executing this binary, but since this function is being called quite a lot throughout the binary, it’s better to analyze it.
String Encryption
The pseudo-code looks like this:
_BYTE *__cdecl get_string(int a1)
{
  v10 = __readgsdword(0x14u);
  index = a1 ^ 0xAA;
  if ( (index & 1) != 0 )
  {
    encrypted_len = strlen((&string_array)[index]);
    decrypted = malloc(encrypted_len / 2);
    encrypted = (&string_array)[index];
    for ( i = 0; encrypted_len / 2 > i; ++i )
      decrypted[i] = MEMORY[0](0x91BDA628, encrypted[2 * i], encrypted[2 * i + 1]);
    result = decrypted;
  }
  else
  {
    v4 = (&string_array)[index];
    sub_804A372((int)v9, (int)v4);
    dest = malloc(*((_DWORD *)v4 + 4));
    memcpy(dest, v4 + 20, *((_DWORD *)v4 + 4));
    for ( j = 0; *((_DWORD *)v4 + 4) > j; j += 16 )
      sub_804B228((int)v9, (int)dest + j);
    result = dest;
  }
  return result;
}
Since sub_804C438’s purpose is basically to get a string, we’ll rename to get_string. We can see that the argument that’s passed to this function is being XORed with 0xAA, and then used as an index in an array of strings located at off_81A5140. The string we get using this index is then being decrypted in one of two ways; one for even indices and another for odd ones. Let’s first have a look at how odd indexed strings are decrypted, by looking at the if clause (renaming a few variables for convenience):
encrypted_len = strlen((&string_array)[index]);
decrypted = malloc(encrypted_len / 2);
encrypted = (&string_array)[index];
for ( i = 0; encrypted_len / 2 > i; ++i )
  decrypted[i] = MEMORY[0](0x91BDA628, encrypted[2 * i], encrypted[2 * i + 1]);
result = decrypted;
Seems like this gets the string from the strings_array, then allocates a new buffer that’s half the size of the encrypted string, then iterates over the encrypted string, decrypting two bytes at a time and returning the decrypted/decoded string as the result of the function. But wait, what does calling MEMORY[0] means? Usually, when you see something that doesn’t seem to make much sense in the decompiler, it’s better going to the disassembler and examine it yourself.
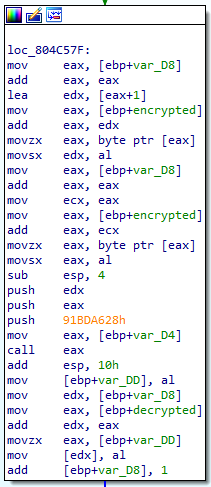
Looking at the relevant basic block, we see this call as a call eax, and we see the value of eax being set to var_D4 right before that. An easy way to quickly navigate the code and see what’s in var_D4 is having the cursor over it and hitting Alt+Up in order to go to the previous location in which it was used. This brings us to this instruction:
.text:0804C453 mov [ebp+var_D4], 0
Looks like we really have a call to address zero, and as you probably know, this is an invalid memory reference since no code is loaded at this location. What’s going on here?
Knowing the nature of this challenge after seeing that child1 handles signals from parent and keeping in mind the fact that child1 forked once more and we put aside that analysis of the second forked process, we may assume that the second forked process can potentially handle this invalid memory reference signal from child1. Enter child2.
Analyzing child2
Let’s have a look at child2_main and see if we see some logic that might be related to the issue at hand.
prctl(PR_SET_DUMPABLE, 0, 0, 0, 0);
signal(PTRACE_PEEKDATA, (__sighandler_t)1);
signal(PTRACE_PEEKUSER, (__sighandler_t)1);
signal(PTRACE_SETFPREGS, (__sighandler_t)1);
if ( ptrace(PTRACE_ATTACH, child1_pid, 0, 0) != -1 )
{
  while ( 1 )
  {
    result = waitpid(child1_pid, &status, 0);
    if ( result == -1 )
      return result;
    v5 = status;
    if ( (unsigned __int8)status == 0x7F )    // is WTERMSIG
    {
      v6 = status;
      signal = (status & 0xFF00) >> 8;
      qmemcpy(s, "I HAVE THE CONCH DON", 20);
      s[20] = (unsigned __int8)"'";
      strcpy(&s[21], "T INTERRUPT ME");
      if ( signal == SIGSEGV )                // invalid memory reference
      {
        ptrace(PTRACE_GETREGS, child1_pid, 0, (int)&child1_regs);
        v11 = ptrace(PTRACE_PEEKDATA, child1_pid, child1_regs.esp, 0);
        v10 = ptrace(PTRACE_PEEKDATA, child1_pid, child1_regs.esp + 4, 0);
        buffer = ptrace(PTRACE_PEEKDATA, child1_pid, child1_regs.esp + 8, 0);
        v8 = ptrace(PTRACE_PEEKDATA, child1_pid, child1_regs.esp + 12, 0);
[. . .]
Here too, we can see that child2 is attaching to child1, and waits for signals. The interesting part starts when we have a SIGSEGV which is an invalid memory reference (like the one we actually saw in child1). First, child2 get the registers of child1 using ptrace, and then it reads 4 values off the stack using the request PTRACE_PEEKDATA. The first argument is the return address of course, then we get the second one which is being used as a magic number again to decide which code path to take using a switch statement, finally, we have two more values that will be used as arguments. So we’ll rename those local variables accordingly and keep looking at the rest of the code.
if ( signal == SIGSEGV )                // invalid memory references
{
	ptrace(PTRACE_GETREGS, child1_pid, 0, (int)&child1_regs);
	ret_addr = ptrace(PTRACE_PEEKDATA, child1_pid, child1_regs.esp, 0);
	magic = ptrace(PTRACE_PEEKDATA, child1_pid, child1_regs.esp + 4, 0);
	arg1 = ptrace(PTRACE_PEEKDATA, child1_pid, child1_regs.esp + 8, 0);
	arg2 = ptrace(PTRACE_PEEKDATA, child1_pid, child1_regs.esp + 12, 0);
while ( child1_regs.eip == -1 )
  ;
if ( magic == 0x44DE7A30 )
{
  child1_regs.eax = arg2 ^ arg1;
}
else if ( magic > 0x44DE7A30 )
{
  switch ( magic )
  {
    case 0x6B4E102C:
      child1_regs.eax = arg1 + arg2;
      break;
    case 0x7E85DB2A:
      child1_regs.eax = 0x9E3779B9;
      break;
    case 0x5816452E:
      child1_regs.eax = sub_804C163(arg1, arg2);
      break;
  }
else
{
  switch ( magic )
  {
    case 0xA4F57126:
      child1_regs.eax = arg2;
      if ( arg2 != -1 )
      {
        copy_from_pid(child1_pid, arg1, (int *)new_buffer, 62);
        if ( strncmp(s1, "@no-flare.com", 0xDu) )
          child1_regs.eax = -1;
      }
      break;
    case 0xB82D3C24:
      child1_regs.eax = arg1 + 1;
      break;
    case 0x91BDA628:
      child1_regs.eax = (0x10 * (arg1 - 1)) | ((_BYTE)arg2 - 1) & 0xF;
      break;
  }
child1_regs.eip = ret_addr;
child1_regs.esp += 4;
ptrace(PTRACE_SETREGS, child1_pid, 0, (int)&child1_regs);
ptrace(PTRACE_CONT, child1_pid, 0, 0);
We can see that there are a few cases for different magic numbers, each of the cases will perform rather simple arithmetic operations on the arguments. The operations are very simple and usually involve changing a register or two. Understanding this, we can ask ourselves a very simple and important question: Can we get rid of child2 and move these operations to child1? Well, the answer is yes.
Getting Rid of the child2
The importance of getting rid of child2 so early in the analysis is that we are removing the debugger that debugged child1, and this will allow us to take control and attach a debugger to the child1. But this, of course, comes with the price. We need to carefully make sure that we are not losing functionality when removing child2. This is because the flow of the program strongly relies on the arithmetic operations done in child2 — without it, the challenge won’t work.
Let’s do a quick recap of how does child1 gives control to child2. To demonstrate it, we can use the handler of the magic value 0x7E85DB2A. This value is triggered by child1 in a code that looks like this:
0x080498AE       83 EC 04            sub     esp, 4
0x080498B1       68 FE CA 00 00      push    0CAFEh
0x080498B6       68 37 13 00 00      push    1337h
0x080498BB       68 2A DB 85 7E      push    7E85DB2Ah
0x080498C0       8B 45 D8            mov     eax, [ebp+zeroValueException]
0x080498C3       FF D0               call    eax
0x080498C5       83 C4 10            add     esp, 10h
As we learned earlier, the call eax instruction will trigger SIGSEGV that will be caught by child2. Looking at the handler in child2, we can see that the operation it performs is very simple. It only moves a hardcoded value 0x9E3779B9 to the eax register of child1.
case 0x7E85DB2A:                  // Pushed at 0x080498BB
    child1_regs.eax = 0x9E3779B9;
Theory
Seeing this, we can’t help but wonder what prevents us from replacing the sequence of instructions from 0x080498AE to 0x080498C5 with nop operations and a single mov eax, 0x9E3779B9. After all, we can easily replace the bytes of the snippet above from child1 83 EC 04 68 FE CA 00 00 68 37 13 00 00 68 2A DB 85 7E 8B 45 D8 FF D0 83 C4 10 with these bytes:
90              ; nop
90              ; nop
90              ; nop
B8 B9 79 37 9E  ; mov    eax, 0x9e3779b9
90              ; nop
90              ; nop
90              ; nop
90              ; nop
...
Easy, right? Not only that it is possible for this example, it is actually possible for all the handlers in child2 — they all fit in a simple patch. There are several ways we can patch the binary.
Classic Patching
The first one is the classic patch. Using the classic patching method, we need to search for the places we want to patch and replace the original bytes with nop instructions and the x86 instructions that can provide us the same functionality as child2. Such patching can be done straight from IDA, or from any other hex editor. Simple, find the sequence of bytes, and patch it.
from malduck import unhex
end_addr = idc.get_segm_end(0)
# Find the sequence of bytes to patch
offset = ida_search.find_binary(0, end_addr,"83 EC 04 68 FE CA 00 00 68 37 13 00 00 68 2A DB 85 7E 8B 45 D8 FF D0 83 C4 10", 16, idc.SEARCH_DOWN)
# Patch them
ida_bytes.patch_bytes(offset,unhex("909090B8B979379E909090909090909090909090909090909090"))
Emulation
The second approach is fancier and doesn’t require us to go and write assembly byte codes by ourselves. In this approach, we set a conditional breakpoint at the top instruction that we want to skip. In the conditional breakpoint, we put a Python or IDC script that will manipulate the registers in an equivalent manner to what child2 is done. Finally, we will change the instruction pointer register, EIP, to the point after the call to eax. If we will take the previous example, we will have to put a conditional breakpoint at 0x080498AE and use the following Python code:
# We set the value of eax
set_reg_value(0x9E3779B9,"eax")

# Move eip 26 bytes forward
eip=get_reg_value("eip")
set_reg_value(eip+0x1a,"eip")
Setting such a conditional breakpoint in IDA is very useful since whenever they will hit, the Python script will be triggered and perform the register manipulations. For many of us, writing Python is easier. That said, this approach will only work while in debug sessions from IDA, which makes it less flexible. For other debuggers, you can use the same method with the API provided by them.
For the sake of this article, we will use the classic patching method as it is easier for the readers to apply it to their favorite platforms and debuggers.
Overcoming Fork
Patching the parts that transfer control to child2 isn’t enough to allow us to debug child1. This is because child1 forks itself so child2 can debug it. If we want to debug child1, without losing functionality, we must overcome this fork and prevent child2 from being born. Thankfully, it is quite simple as all we need to do is to patch the part in child1 that is responsible for the fork.
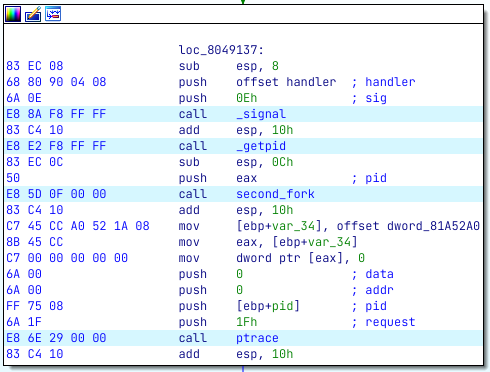
To do this, we can nop everything from 0x8049137 until 0x804915A which is the instruction add esp, 10h after the call to the second fork. Now, the program can run and function correctly without child2.
Patching child1
Now that we are aware to all the patches we need to do, we can quickly write an IDA Python script that does the work for us.
from malduck import unhex

end_addr = idc.get_segm_end(0)

offset = ida_search.find_binary(0, end_addr,"83 EC 04 52 50 68 24 3C 2D B8 8B 45 D8 FF D0 83 C4 10", 16, idc.SEARCH_DOWN)
# inc    eax
ida_bytes.patch_bytes(offset,unhex("909090409090909090909090909090909090"))

offset = ida_search.find_binary(0, end_addr,"83 EC 04 68 FE CA 00 00 68 37 13 00 00 68 2A DB 85 7E 8B 45 D8 FF D0 83 C4 10", 16, idc.SEARCH_DOWN)
# mov    eax,0x9e3779b9
ida_bytes.patch_bytes(offset,unhex("909090B8B979379E909090909090909090909090909090909090"))

offset = ida_search.find_binary(0, end_addr,"83 EC 04 52 50 68 2C 10 4E 6B 8B 45 F0 FF D0 83 C4 10", 16, idc.SEARCH_DOWN)
# add    eax,edx
ida_bytes.patch_bytes(offset,unhex("90909001D090909090909090909090909090"))

offset = ida_search.find_binary(0, end_addr,"83 EC 04 52 50 68 2E 45 16 58 8B 45 F0 FF D0 83 c4 10", 16, idc.SEARCH_DOWN)
# push   edx
# push   eax
# call   0xffffff86
ida_bytes.patch_bytes(offset,unhex("9090905250E87CFFFFFF909090909083C408"))

offset = ida_search.find_binary(0, end_addr,"83 EC 04 52 50 68 30 7A DE 44 8B 45 F0 FF D0 83 C4 10", 16, idc.SEARCH_DOWN)
# xor    eax,edx
ida_bytes.patch_bytes(offset,unhex("90909031D090909090909090909090909090"))

offset = ida_search.find_binary(0, end_addr,"83 EC 04 52 50 68 28 A6 BD 91 8B 85 2C FF FF FF FF D0 83 C4 10", 16, idc.SEARCH_DOWN)
# dec    eax
# shl    eax,0x4
# dec    edx
# and    edx,0xf
# or     eax,edx
ida_bytes.patch_bytes(offset,unhex("48C1E0044A83E20F09D09090909090909090909090"))

offset = ida_search.find_binary(0, end_addr,"83 EC 08 68 80 90 04 08 6A 0E E8 8A F8 FF FF 83 C4 10 E8 E2 F8 FF FF 83 EC 0C 50 E8 5D 0F 00 00 83 C4 10", 16, idc.SEARCH_DOWN)
# Fill the second fork with nops
ida_bytes.patch_bytes(offset,unhex("9090909090909090909090909090909090909090909090909090909090909090909090"))
To apply the patches to the original binary, we can go to Edit → Patch program → Apply patches to input file.
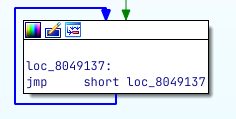
Now that we made the patches, we want to be able to attach a debugger to the patched program. Naturally, we still have child1 that debugs the parent process, and this means that we can not start our debugging session from the parent. Instead, we’d want to attach IDA debugger to child1 before it starts the important operations. To do this, we can utilize a very nice trick in x86 that causes the program to loop infinitely. The trick is to use the pair of bytes EB FE that will cause the program to jump to the current location. To use it, we can change our last patch in the screen above, and place EB FE inside. When the program will reach these bytes, it will “wait” for us to attach our debugger to it. When attached, we can simply change our instruction pointer to one of the nop instructions after the infinite loop, and we can debug the program step by step.
offset = ida_search.find_binary(0, end_addr,"83 EC 08 68 80 90 04 08 6A 0E E8 8A F8 FF FF 83 C4 10 E8 E2 F8 FF FF 83 EC 0C 50 E8 5D 0F 00 00 83 C4 10", 16, idc.SEARCH_DOWN)
# Fill the second fork with EB FE (infinte loop) followed by nops
ida_bytes.patch_bytes(offset,unhex("EBFE909090909090909090909090909090909090909090909090909090909090909090"))`
This is how IDA shows the infinite loop of EB FE.
Having the ability to debug the program will make the analysis easier, but since the goal of the write-up is to thoroughly explain the flow of the challenge, and because many of our readers did not use a similar patching method, we will still keep the “child1” and “child2” terminology.
Decrypting the Strings
Let’s back and focus on the magic number we saw being used by child1 which is 0x91BDA628. The simple arithmetic operation will use our two arguments and store the result in eax of child1. After doing the work based on the magic number, child2 will make child1 perform a ret — it’ll set its eip to the return address, add 4 to the stack pointer, set its registers, and continue its execution using PTRACE_CONT.
Now we know what this calling of address 0 is doing, and we can quickly use python to try and decrypt a string and see if our understanding is indeed correct.
def decrypt_odd(s):
    dec = []
    for i in range(0, len(s), 2):
        dec.append(((0x10 * (s[i] - 1)) | (s[i+1]- 1) & 0xf) & 0xff)
    return ''.join([chr(c) for c in dec])

decrypt_odd(b"FEHCGBGDGFHCFAGJGEDKCACFGEAA")

# Results:
# 'TracerPid: %d\x00'
Looks like it worked!
Ctrl+Alt+F and FindCrypt will rename and show you all the crypto constants within the binary.Now, let’s move on to the odd strings decryption.
v4 = (&string_array)[index];
sub_804A372((int)v9, (int)v4);
dest = (char *)malloc(*((_DWORD *)v4 + 4));
memcpy(dest, v4 + 20, *((_DWORD *)v4 + 4));
for ( j = 0; *((_DWORD *)v4 + 4) > j; j += 16 )
  sub_804B228(v9, &dest[j]);
result = dest;
We see that sub_804A372 is being called with the start of the decrypted string/data, then a new buffer for the result is being allocated with a DWORD size that is read from the 5th DWORD in the decrypted data, and finally, there is a loop that iterates the data starting from the 6th DWORD, in 16 bytes blocks and (probably) decrypts each block using sub_804B228. Taking a quick peek at sub_804A372, we see it simply wraps sub_804A11A. Looking at these functions, we notice that FindCrypt helped us identify a RijnDael_AES_LONG constant that suggests that maybe this decryption of odd indexed strings is simply generic AES. If we weren’t using FindCrypt, we could have simply gone to the actual byte array and search for the values to see if it contains some known crypto constants.
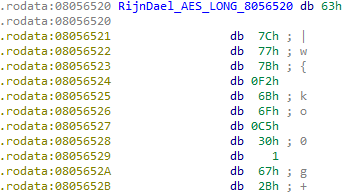
We would get Rijndael in the first search result:
Now when that’s out of the way, we have two options:
- Understand exactly how AES is implemented here, and figure out if that’s a classic implementation
- Assume this is a normal implementation, and try to decrypt the data we see
If you really need to understand how this binary works, option 1 will probably be your go-to, in this case, it’s always good to have a look at a simple source code implementation of AES, like this one. However, since we’re in a CTF and all we want from this binary is our precious flag, it’ll probably be more efficient to go with option 2.
From the decryption code we saw before, we know that the size of the encrypted data is probably at offset 16 (based on the allocation and the decryption loop). Another thing we can assume is that the actual encrypted data starts right after the size, at offset 20 (based on the memcpy to the new buffer). So it’ll be reasonable to assume that the key to our encrypted data is in the first 16 bytes (offset 0) of the data. Let’s put that to the test and try to decrypt the string that this function returns if passed 0xB8 as the argument.
from malduck import unhex, aes

# 0xB8 ^ 0xAA results with 18 and will be the index in the strings array
bytes = unhex("62F0084EFFD0F3E99C3E8EAC5C1468B720000000C6F267D8795D510BA500FDA48CFF7F331F819E5EAA57E0FD29F2D416715F9EC2")

key = bytes[:16]
size = bytes[16:20]
data = bytes[20:]
aes.ecb.decrypt(key, data)

# Results:
# b'sorry i stole your input :)\x00\x00\x00\x00\x00'
Turns out we were right. Now we also understand where the ‘sorry i stole your input :)’ output comes from (remember that child1 writes this string to the input_buffer in parent).
Understanding the First Check
Let us now regroup, and come back to parent’s main:
void __cdecl __noreturn main()
{
  puts("welcome to the land of sunshine and rainbows!");
  puts("as a reward for getting this far in FLARE-ON, we've decided to make this one soooper easy");
  putchar(10);
  printf("please enter a password friend :) ");
  buf[read(0, buf, 0xFFu) - 1] = 0;
  if ( check_input(buf) )
    printf("hooray! the flag is: %s\n", buf);
  else
    printf("sorry, but '%s' is not correct\n", buf);
  exit(0);
}
The next thing that happens here is the call to the check_input function. Since child1 changed the first bytes in the code of check_input, parent’s invocation of this function will execute an illegal instruction (0xB0F) and a SIGILL will be sent to child1. If we look at the rest of child1_main we’ll see the code responsible for handling this signal.
if ( (status & 0xFF00) >> 8 == SIGILL )
{
  input_len = strlen(input_buffer);
  copy_to_pid(parent_pid, (int)input_buffer, (int *)input_buffer, input_len);
  ptrace(PTRACE_GETREGS, parent_pid, 0, (int)&parent_regs);
  parent_esp = parent_regs.esp;
  if ( ptrace(PTRACE_POKEDATA, parent_pid, parent_regs.esp + 4, (int)input_buffer) == -1 )
    exit(0);
  parent_regs.eip = (int)sub_8048DCB;
  ptrace(PTRACE_SETREGS, parent_pid, 0, (int)&parent_regs);
}
What we have here is as follows:
- child1 copies the input of the user is read to the same address in parent’s memory.
- child1 sets the instruction pointer of parent to point to
sub_8048DCB1, which we’ll rename toactual_check_inputsince this code will be executed instead ofcheck_input, and it will receive the same argument — the user’s input.
Our journey to the flag continues into actual_check_input.
int __cdecl actual_check_input(char *input_buffer)
{
  v5 = strlen(input_buffer);
  argv[0] = "rm";
  argv[1] = "-rf";
  argv[2] = "--no-preserve-root";
  argv[3] = "/";
  argv[4] = 0;
  execve(input_buffer, argv, 0);
  --v5;
  v4 = -nice(0xA5);
  sub_804B495(v2, v4);
  sub_804BABC(v2, &unk_81A50EC);
  sub_804BABC(v2, &unk_81A50F0);
  sub_804BABC(v2, &unk_81A50F4);
  sub_804BABC(v2, &unk_81A50F8);
  if ( !memcmp(input_buffer, &unk_81A50EC, 0x10u) )
  {
    memset(&unk_81A50EC, 0, 0x10u);
    result = sub_8048F05(input_buffer + 16);
  }
  else
  {
    memset(&unk_81A50EC, 0, 0x10u);
    result = 0;
  }
  return result;
}
Here we see the best troll of this challenge - a call to execve with an argv pointing to "rm -rf --no-preserve-root /" which is quite disturbing on its own. Having said that, since we already know the mechanism at play here, we know that child1 is going to receive control at this point, instead of parent really executing an execve syscall.
Let’s calculate our correct magic number again, and locate the appropriate code path that will handle the execve syscall in child1_main:
Python> 0x1337CAFE * (11 ^ 0xDEADBEEF) & 0xffffffff # 11 == EXECVE
0xf7ff4e38
else if ( magic == 0xF7FF4E38 ) // execve
{
  buf = malloc(0x12Cu);
  sub_804BCBE(parent_pid, parent_regs.ebx, (int)buf, 300);
  size = strlen((const char *)buf);
  if ( *((_BYTE *)buf + size - 1) == 0xA )
    ptrace(PTRACE_POKEDATA, parent_pid, parent_regs.ebx + size - 1, 0);
  free(buf);
}
These few lines of code allocate a local buffer and then copy the input_buffer from the parent (ebx holds the first syscall parameter, which is the pointer to the input_buffer in this case, and sub_804BCBE copies that data using PTRACE_PEEKDATA again). Then, child1 will check whether the last character of the input is 0xA(line feed) and will replace it with zero using PTRACE_POKEDATA in the parent. This means that the whole execve purpose here is to strip the user input. Oh well, let’s continue to see which other syscalls parent will try to invoke.
After getting the scary execve out of our way, there’s really one thing that’s very interesting to anyone trying to get the flag - a memcmp with the input_buffer. If we could get our hands on the memory to which our input is being compared, we will surely get the flag or at least some of it. It looks like this memory which is at unk_81A50EC, is being modified by all those function calls before the memcmp, so of course, we can try and understand the logic, but a better option (this is a CTF mind you), is to simply examine this memory dynamically after it already got modified. But, as you already know, we can’t really put a breakpoint at this point and look at the memory since this process is already being ptraced. We do, however, have 2 great option at our disposal:
- Patch the call. Make
parentcallwrite(or another function that’ll output to the screen likeputsfor instance) with the memory we’d like to see instead ofmemcmpand it will basically hand us the flag. - Hook
memcmpto see what’s in the two memory locations being compared.
Both options will work, but we’ll demonstrate option 1.
Patching memcmp
First let’s have a look at the assembly code of the call we’d like to change.
.text:08048EAC 6A 10                push    10h             ; n
.text:08048EAE 68 EC 50 1A 08       push    offset unk_81A50EC ; s2
.text:08048EB3 FF 75 08             push    [ebp+input_buffer] ; s1
.text:08048EB6 E8 25 FB FF FF       call    _memcmp
E8 is a relative call, which means that in order to get to memcmp we’ll jump from the address after the call instruction 0xfffffb25 bytes forward and we’ll get to 0x080489E0. In order to replace memcmp with write, we’ll first get the address of our _write function from IDA (0x08048AD0), and then perform the following:
Python>from malduck import p32
Python>ida_bytes.patch_bytes(0x08048EB6+1, p32(0x08048AD0 - here() -5))
What we pass to patch_bytes is first the address of bytes we’d like to patch, which is the address of the value of our relative call (right after the E8) and then the actual bytes which we calculate based on our current location and the location of _write (we subtract 5 since the size of the entire call instruction is 5 bytes). Et voila:
.text:08048EA6 83 C4 10             add     esp, 10h
.text:08048EA9 83 EC 04             sub     esp, 4
.text:08048EAC 6A 10                push    10h             ; n
.text:08048EAE 68 EC 50 1A 08       push    offset unk_81A50EC ; s2
.text:08048EB3 FF 75 08             push    [ebp+input_buffer] ; s1
.text:08048EB6 E8 15 FC FF FF       call    _write
Then, we’d like to change the first argument so it’ll write our bytes to STDOUT. With our cursor on the last push (1st argument), we’ll go to Edit→Patch program→Assemble… and we’ll change the instruction to push 1.

Now we’ll just patch the actual binary by going to Edit→Patch Program→Apply patches to input file… and execute. We get:
$ ./break-patched
welcome to the land of sunshine and rainbows!
as a reward for getting this far in FLARE-ON, we've decided to make this one soooper easy

please enter a password friend :) oh
w3lc0mE_t0_Th3_lsorry, but 'sorry i stole your input :)' is not correct
The start of the flag is w3lc0mE_t0_Th3_l!
Stage 2
Analyzing the Second Check
Since we only got part of the flag, let’s continue analyzing what happens in our actual_check_input function, executed by the parent.
if ( !memcmp(input_buffer, &unk_81A50EC, 0x10u) )
{
  memset(&unk_81A50EC, 0, 0x10u);
  result = sub_8048F05(input_buffer + 16);
If we indeed insert the correct 16 bytes of the flag, parent will call sub_8048F05 and pass the rest of our input into it, probably for validation. It’s only natural that we’ll rename this function as check_rest_input.
_BOOL4 __cdecl check_rest_input(void *rest_input_buffer)
{
  s = (char *)-nice(0xA4);
  v1 = strlen(s);
  v5 = sub_804BFED(0LL, (int)s, v1);
  v4 = 40000;
  memcpy(&file, rest_input_buffer, 0x20u);
  for ( i = 0; i < v4; i += 8 )
    sub_804C369((__mode_t *)(&file + i), v5, SHIDWORD(v5), v3);
  return truncate(&file, 32) == 32;
}
This function seems quite simple at first glance, but as we learned already - there’s more to this challenge than meets the eye.
At a high-level view, this seems like another decryption routine, that iterates over 8-byte blocks this time. We also see some glibc functions that don’t seem to make much sense in this context like nice and truncate, but as we saw before with execve, child1 might alter their behavior altogether. As opposed to the previous part we solved, here we don’t have any clear comparison of two memory areas, one containing our input and the other the desired result, so we’d like to dig a little deeper to see how the syscalls in every glibc function here behave.
Understanding nice
The nice function in Linux can change the priority of the calling thread. Looking at its usage here, it seems like the code expects nice to return a string pointer, which we’d like to keep in mind while analyzing the next part.
It’s a good idea to look at the source code of nice, so we can see exactly which syscalls are invoked by this function.
int nice (int incr)
{
  int save;
  int prio;
  int result;
  /* -1 is a valid priority, so we use errno to check for an error.  */
  save = errno;
  __set_errno (0);
  prio = **__getpriority** (PRIO_PROCESS, 0);
  if (prio == -1)
    {
      if (errno != 0)
        return -1;
    }
  result = **__setpriority** (PRIO_PROCESS, 0, prio + incr);
  if (result == -1)
    {
      if (errno == EACCES)
        __set_errno (EPERM);
      return -1;
    }
  __set_errno (save);
  return **__getpriority** (PRIO_PROCESS, 0);
}
3 syscalls are invoked here - getpriority, setpriority, and finally getpriority once more. Let us calculate the magic value for each system call and locate an appropriate code in child1 that handles this syscall.
else if ( magic == 0x9678E7E2 ) // getpriority
{
  if ( *v37 < 0 )
    parent_regs.eax = *v37;
  else
    parent_regs.eax = *v37 + 20;
  ptrace(PTRACE_SETREGS, parent_pid, 0, (int)&parent_regs);
  *v37 = 0;
}

[...]

else if ( magic == 0x83411CE4 ) // setpriority
{
  buf = get_string(parent_regs.edx);
  v4 = strlen((const char *)buf);
  copy_to_pid(parent_pid, (int)dword_81A52A0, (int *)buf, v4 + 1);
  *v37 = -(int)dword_81A52A0;
  free(buf);
  parent_regs.eax = 0;
  ptrace(PTRACE_SETREGS, parent_pid, 0, (int)&parent_regs);
}
Let’s take a look at the flow of our nice call:
getpriorityis invoked for the first time. This timev37points todword_81A52A0(it has been initialized at the start ofchild1_main), so child1 returns this value + 20 which doesn’t help us that muchsetpriorityis invoked with theincrof the originalniceargument as its argument. Then, it gets a string using this argument as the parameter, copies this string todword_81A52A0(let’s refer to is asnice_bufferfrom now on) in the parent, and finally setsv37to point to-nice_buffergetpriorityis invoked for the second time. This timev37is negative, so this will return our-nice_buffer
This is how nice is able to get a string to parent.
Understanding truncate
Next, we’ll look at the truncate call. Parent passes the address of file and 32 to it, while it expects the value to be 32. Examining file we see a big buffer that contains a lot of data but we’re not sure what it is yet.
Before calling truncate, check_rest_input copies the next 32 bytes of our input into the start of that big buffer. Let’s change its name to huge_buffer and keep in mind that that our input is at its start while analyzing the next part. You know the drill - we need to calculate the magic value of truncate and get to the code in child1 that handles it.
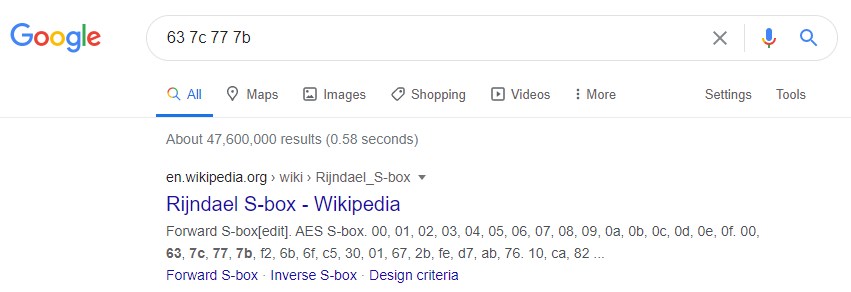
case 0x4A51739A:              // truncate
  copy_from_pid(parent_pid, parent_regs.ebx, (int *)&huge_buffer, 40000);
  for ( i = 0; i <= 39999 && *(_BYTE *)(i + 0x804C640); ++i )
  {
    v14[i] = *(_BYTE *)(i + 0x804C640);
    if ( v42 == -1 && v14[i] != *(_BYTE *)(i + v) )
      v42 = i;
  }
  v42 = v40(0xA4F57126, input_buffer, v42);
  parent_regs.eax = v42;
  ptrace(PTRACE_SETREGS, parent_pid, 0, (int)&parent_regs);
  break;
Looking at the local variables here, v14 is a local buffer that’s 16000 bytes in size and we’ll refer to it as child1_16000_buff, while v40 is simply initialized to 0 in child1_main and never changed later so we’ll rename it to zero. We also have here references to 2 addresses:
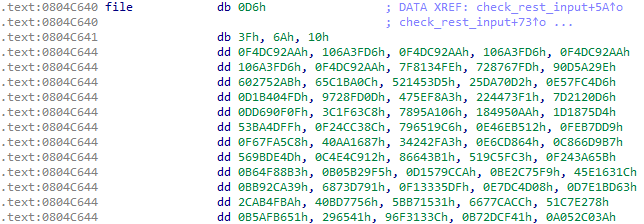
0x804C640- which is the address of ourhuge_buffer0x81A5100- address that points to 32 bytes of unknown data
So what’s going on here is that after copying the huge_buffer from the parent (which contains our input) to the same address in child1, there will run a for loop that will iterate the 40000 bytes in this buffer, copy every byte into child1_16000_buff (mind you we’re copying 40000 bytes into a 16000 bytes buffer. We’ll see why in the future), and will compare this huge_buffer to the data that is at 0x81A5100. Finally, it’ll store the number of equal bytes in v42 (we’ll rename it to equal_bytes_count).
So the next 32 characters of our input basically get modified by check_rest_input and the result of this modification is compared to the 32 bytes at 0x81A5100. Now we have 2 options to choose from:
- Assume this is a classic implementation of a known algorithm, identify it, and use it to understand what input we need to provide.
- Understand this algorithm better, and perform the reverse process, to get the input we need from the result the binary expects.
Option 1 tends to be the easier and faster option to use if that’s really the case, but even though we’ll see some known crypto constants being used by check_rest_input, this doesn’t seem to be the case here (we’ll cover those in a bit).
Since option 1 is not relevant here, we’ll go for the second one. There are many ways to peel a potato, and we’d like to show 2 great methods of approaching this - Hooking and debugging.
Understanding the Second Check
Before we dive into each of our chosen methods, we need to better understand the algorithm in order to understand what it is we’re actually after so we’ll continue looking at the functions that check_rest_input calls.
_BOOL4 __cdecl check_rest_input(void *rest_input_buffer)
{
  s = (char *)-nice(0xA4);
  v1 = strlen(s);
  v5 = sub_804BFED(0LL, (int)s, v1);
  v4 = 40000;
  memcpy(&huge_buffer, rest_input_buffer, 0x20u);
  for ( i = 0; i < v4; i += 8 )
    sub_804C369((__mode_t *)(&huge_buffer + i), v5, SHIDWORD(v5), v3);
  return truncate(&huge_buffer, 32) == 32;
}
Starting with sub_804BFED:
unsigned __int64 __cdecl sub_804BFED(unsigned __int64 a1, int a2, unsigned __int64 a3)
{
  for ( i = 0LL; i < a3; ++i )
  {
    v3 = (unsigned __int8)(*(_BYTE *)(i + a2) ^ a1);
    LODWORD(a1) = (a1 >> 8) ^ dword_8056960[2 * v3];
    HIDWORD(a1) = (HIDWORD(a1) >> 8) ^ dword_8056964[2 * v3];
  }
  return a1;
}
Since this function only performs some arithmetic operations on the string we got from the call s = -nice(0xA4) (that we already decrypted so we know it’s 'This string has no purpose and is merely here to waste your time.'), it’ll be easy to get the result of it. Whether it’s by implementing it with Python or examining the value during runtime. So we’ll continue right away to the second function sub_804C369 which is much more interesting.
unsigned int __cdecl sub_804C369(__mode_t *a1, int a2, int a3, const char *a4)
{
  v11 = __readgsdword(0x14u);
  v6 = 0;
  sub_804C217(__PAIR64__(a3, a2), 16, (int)a4);
  v7 = *a1;
  mode = a1[1];
  v5 = 0;
  v9 = mode;
  v10 = v7 ^ chmod(a4, mode);
  v7 = mode;
  mode = v10;
  MEMORY[0](&loc_804C3C4, &v5);
  *a1 = mode;
  a1[1] = v7;
  return __readgsdword(0x14u) ^ v11;
}
First, let’s examine the unique mechanisms we have here. We notice right away there is another invocation of address 0, which will send a SIGSEGV signal to child1 this time. Here is the code from child1_main that handles it:
if ( (status & 0xFF00) >> 8 == SIGSEGV )
{
  ptrace(PTRACE_GETREGS, parent_pid, 0, (int)&parent_regs);
  ret_addr = ptrace(PTRACE_PEEKDATA, parent_pid, parent_regs.esp, 0);
  arg1 = ptrace(PTRACE_PEEKDATA, parent_pid, parent_regs.esp + 4, 0);
  arg2 = ptrace(PTRACE_PEEKDATA, parent_pid, parent_regs.esp + 8, 0);
  deref_arg2 = ptrace(PTRACE_PEEKDATA, parent_pid, arg2, 0) + 1;
  parent_regs.esp += 4;
  if ( deref_arg2 > 0xF )
  {
    parent_regs.eip = ret_addr;
  }
  else
  {
    parent_regs.eip = arg1;
    ptrace(PTRACE_POKEDATA, parent_pid, arg2, deref_arg2);
    parent_regs.esp += 16;
  }
  ptrace(PTRACE_SETREGS, parent_pid, 0, (int)&parent_regs);
}
This piece of code reads the return address and two arguments from the stack, then dereferences arg2 to get the value it points to, and finally pops the return address off of the stack. After that, the value in arg2 is tested against 15 - if it’s bigger than 15, the code will set the parent instruction pointer to the return address, and will just return normally without doing much. But if this value is smaller than 15, the parent’s instruction pointer will be set to the first argument and the stack will be unwound. Let’s go back to look at the arguments that this piece of code gets, to make some sense out of this.
MEMORY[0](&loc_804C3C4, v5);
The first one is the address 0x804C3C4 which is located just a few instructions above the call 0, and the second argument is a local variable. We can now understand that this is a loop!
When the code gets to the dynamic call at 0x804C40C it will loop around to the start of the basic block at 0x804C3C4 and this will happen 16 times, while the local variable v5 will hold the loop counter (initialized to zero before the loop and incremented every iteration by child1).
The next thing we’d better look at in sub_804C369 and in sub_804C217 (which it invokes) is the invocation of glibc functions since we already know they don’t function as usual. There’s a use in chmod, pivot_root, mlockall and uname. We’ll do our thing again - calculate the magic value and locate the relevant code in child1_main:
if ( magic == 0xE8135594 )          // pivot_root
{
  ptrace(PTRACE_POKEDATA, parent_pid, parent_regs.ebx, parent_regs.ecx);
}

[. . .]

else if ( magic == 0x9C7A9D6 )      // uname
{
  ptrace(PTRACE_POKEDATA, parent_pid, parent_regs.ebx, 0xC6EF3720);
  v6 = zero(0x7E85DB2Au, (char *)0x1337, 0xCAFE);
  ptrace(PTRACE_POKEDATA, parent_pid, parent_regs.ebx + 4, v6);
}

[. . .]

if ( magic == 0xC93DE012 )          // mlockall
{
  LODWORD(v13) = ptrace(PTRACE_PEEKDATA, parent_pid, parent_regs.ebx, 0);
  HIDWORD(v13) = ptrace(PTRACE_PEEKDATA, parent_pid, parent_regs.ebx + 4, 0);
  v43 = 0;
  while ( v13 )
  {
    if ( (v13 & 1) != 0 )
      v43 = (char *)zero(0xB82D3C24, v43, HIDWORD(v13));
    v13 >>= 1;
  }
  parent_regs.eax = (int)v43;
  ptrace(PTRACE_SETREGS, parent_pid, 0, (int)&parent_regs);
}

[. . .]

else if ( magic == 0xAB202240 )     // chmod
{
  copy_from_pid(parent_pid, parent_regs.ebx, v11, 248);
  parent_regs.eax = sub_804C19C(v11, parent_regs.ecx);
  ptrace(PTRACE_SETREGS, parent_pid, 0, (int)&parent_regs);
}
Let’s see what each function is doing.
pivot_root- writes the value ofecxintoebx(second parameter into the third one)uname- writes the DWORD0xC6EF3720toebx(first parameter). You may recognize this constant value as a crypto constant from TEA, but as we’ll soon see this is just a red herring. Then it invokes address zero again, but keep in mind that we’re already executing in the context of child1, so if we ignore the patching we made to get rid of child2, we need to look at the code that’s handling theSIGSEGVin child2 and locate the correct code path for the argument0x7E85DB2A.case 0x7E85DB2A: child1_regs.eax = 0x9E3779B9; break;Turns out it only returns
0x9E3779B9, which is yet another red herring to TEA. So this value is being written toebx+4.mlockall- this one takes a full 8 bytes fromebxand then iterates all the bits in it. In every loop iteration, it callszeroagain, this time with the argument0xB82D3C24. Locating the relevant code in child2 shows us this:case 0xB82D3C24: child1_regs.eax = arg1 + 1;So it simply does
v43++. This meansmlockallwill return the number of bits set to one in the 8-byte argument.chmod- copies 248 bytes from the first argument that parent supplied, and then callssub_804C19Cwith the bytes copied and the second argument it got.int __cdecl sub_804C19C(_DWORD *copied_bytes, int arg2) { v2 = MEMORY[0](0x6B4E102C, arg2, copied_bytes[7]); v3 = MEMORY[0](0x5816452E, v2, copied_bytes[41]); return MEMORY[0](0x44DE7A30, v3, copied_bytes[19]); }This function once again triggers a
SIGSEGV, so let’s look at the relevant cases in child2:case 0x6B4E102C: child1_regs.eax = arg1 + arg2; break; [ . . .] case 0x5816452E: child1_regs.eax = sub_804C163(arg1, arg2); break; [ . . .] if ( magic == 0x44DE7A30 ) { child1_regs.eax = arg2 ^ arg1; }It’s very clear that
0x6B4E102Cis doing addition and that0x44DE7A30is XORing the two arguments. And if we take a look atsub_804C163we can see the simple calculation that0x5816452Eis doing.unsigned int __cdecl sub_804C163(unsigned int a1, char a2) { return (a1 >> (a2 & 0x1F)) | (a1 << (-(a2 & 0x1F) & 0x1F)); }
Armed with that knowledge, let’s dive into that algorithm in check_rest_flag. Let’s rename sub_804C369 to decrypt_block and look at our algorithm.
for ( i = 0; i < v4; i += 8 )
  decode_block((__mode_t *)(&huge_buffer + i), value_64bit, SHIDWORD(value_64bit), buffer_3968);
return truncate(&huge_buffer, 32) == 32;
So it calls decrypt_block every 8 bytes, passing the current block as the first argument, alongside the 64-bit number calculated base on the string from nice, and a local buffer of 3968 bytes.
The decompiler struggles here (probably due to the weird loop mechanism), so we’ll try to write the pseudo-code for decrypt_block ourselves.
unsigned int __cdecl decode_block(__mode_t *block, int value_64bit_l, int value_64bit_h, const char *buffer_3968)
{
	v11 = __readgsdword(0x14u);
  v6 = 0;
  sub_804C217(__PAIR64__(value_64bit_h, value_64bit_l), 16, (int)buffer_3968);
  current_dword = *block;
  next_dword = block[1];
  exec_counter = 0;
  for (int i=0; i < 16; i++)
	{
	  v10 = current_dword ^ chmod(buffer_3968[i*0xf8], next_dword);
	  current_dword = next_dword;
	  next_dword = v10;
	}
  *block = next_dword;
  block[1] = current_dword;
  return __readgsdword(0x14u) ^ v11;
}
This looks like something we can easily reverse in Python. Let’s just see what else we got in sub_804C217, it should initialize buffer_3968 since no one else does. This function uses the unique loop mechanism as well, so again we’ll freely decompile the function our own (or just follow the assembly since this is a short function):
_DWORD *__cdecl sub_804C217(unsigned __int64 value_64bit, int a2, _DWORD *buffer_3968)
{
  v9 = __readgsdword(0x14u);
  var_30 = value_64bit;
  v5 = 0;
  exec_counter = 0;
	for (int i=0; i < 16; i++)
	{
	  pivot_root(buffer_3968[i * 0xf8 + 7], value_64bit);
	  pivot_root(buffer_3968[i * 0xf8 + 0x13], HIDWORD(value_64bit));
	  buffer_3968[0x29] = mlockall((int)&var_30) / 2;
	  v6 = var_30 & 1;
	  var_30 >>= 1;
	  if ( v6 == 1 )
	  {
	    uname(&v8);
	    var_30 ^= v8;
	  }
	}
  v5(&loc_804C257, &exec_counter);
  return buffer_3968;
We’ll start by solving this with the debugging method first, followed by the hooking method. Both are very similar and we wanted to show you both so you can have another opportunity to learn something new.
Debugging Method
Previously we show how we can get rid of child2 by patching key points in child1 and executing an infinite loop that will allow us to attach a debugger to it. Having such access to child1 will allow us to easily grab the values we want from pivot_root and mlockall.
To start, execute the patched binary file:
$ ./break_patched
The program will hang in the infinite loop and this will allow us to attach the IDA debugger to it. Got to “Debugger → Attach to process” and search for “break_patched” (or the name you gave to your patched binary). Unlike before, now we only have two processes of break running, thanks to the method we used to get rid of child2. Choose child1 (it will have a higher PID) and press OK to attach the debugger to it. We will land at the infinite loop.
Now, either set eip to point at one of the nop instructions (e.g 0x8049139) or simply use “Edit → Patch program → Change bytes” and replace EB FE with 90 90.
Now, we want to add two conditional breakpoints that will print to the screen the values from pivot_root and mlockall.
To print the value of pivot_root put a conditional breakpoint at 0x080496D8 with the following Python code that prints edx.
edx = get_reg_value("edx")
print(f"pivot_root: {edx:#x}")
Next, put a breakpoint at 0x080497AF that will print the value from mlockall that resides in the eax register.
eax = get_reg_value("eax")
print(f"mlockall: {eax}")
Now click Continue so the debugger will run, and go to your terminal to give input to the program. Quickly go to IDA and pause the program. By now, you should see our prints on the Output window.
pivot_root: 0x4b695809
pivot_root: 0x674a1dea
mlockall: 30
pivot_root: 0xe35b9b24
pivot_root: 0xad92774c
mlockall: 34
pivot_root: 0x71adcd92
pivot_root: 0x56c93ba6
mlockall: 34
pivot_root: 0x38d6e6c9
pivot_root: 0x2b649dd3
mlockall: 34
pivot_root: 0x5a844444
pivot_root: 0x8b853750
mlockall: 24
pivot_root: 0x2d422222
pivot_root: 0x45c29ba8
mlockall: 24
[ . . . ]
We can then use the values in our script and reveal the second part of the flag. Not before we will go over another method to achieve the same — the hooking method.
Hooking Method
Here’s our plan:
- Hook
pivot_rootandmlockallin order to get all the values that are being used to initializebuffer_3968 - Implement a script that will initialize
buffer_3968based on the values we got from our hooks - Finally, the script will reverse the process that’s in
decrypt_blockto get from the data in that’s at0x81A5100to the desired input (the flag)
The easiest way to hook functions in a Linux environment is to use LD_PRELOAD, which will make our shared object load into the process (our challenge) and give us the ability to hook glibc functions.
// hook.c
// gcc -m32 -shared -fPIC -D_GNU_SOURCE hook.c -o hook.so
#include <stdio.h>
#include <stdint.h>
#include <dlfcn.h>

int pivot_root (int arg1, int arg2)
{
	static int (*func_pivot_root) (const void*, size_t) = NULL;
	int retval = 0;

	if (! func_pivot_root)
		func_pivot_root = (int (*) (int, const void*, size_t)) dlsym (RTLD_NEXT, "pivot_root");
	fprintf(stdout, "[HOOK] pivot_root a1: 0x%x a2: 0x%x \n", arg1, arg2);

	retval = func_pivot_root (arg1, arg2);
	return retval;
}

int mlockall (uint64_t arg)
{
	static int (*func_mlockall) ( size_t) = NULL;
	int retval = 0;

	if (! func_mlockall)
		func_mlockall = (int (*) (int, const void*, size_t)) dlsym (RTLD_NEXT, "mlockall");

	retval = func_mlockall (arg);
	fprintf(stdout, "[HOOK] mlockall() returned %d\n", retval);
	return retval;
}
After compiling this shared object, let’s execute our challenge and let it run until at least the first few blocks have been decrypted so our hooking will have a chance to print out the relevant values.
$ gcc -m32 -shared -fPIC -D_GNU_SOURCE hook.c -o hook.so
$ LD_PRELOAD=./hook.so ./break
welcome to the land of sunshine and rainbows!
as a reward for getting this far in FLARE-ON, we've decided to make this one soooper easy

please enter a password friend :) w3lc0mE_t0_Th3_l
[HOOK] pivot_root a1: 0xff86be58 a2: 0x4b695809
[HOOK] pivot_root a1: 0xff86be88 a2: 0x674a1dea
[HOOK] mlockall() returned 30
[HOOK] pivot_root a1: 0xff86bf50 a2: 0xe35b9b24
[HOOK] pivot_root a1: 0xff86bf80 a2: 0xad92774c
[HOOK] mlockall() returned 34
[HOOK] pivot_root a1: 0xff86c048 a2: 0x71adcd92
[HOOK] pivot_root a1: 0xff86c078 a2: 0x56c93ba6
[HOOK] mlockall() returned 34

[ . . .]
Calculating the 2nd part of the flag
Hurray! Now with some VS Code magic in the form of regex replacements and multiline editing, we’ll get those values into two arrays in the following script:
from malduck import p32, unhex

# Construct buffer_3968 from pivot_root and mlockall hooks as in sub_804C217
pivot = [0x4b695809, 0x674a1dea, 0xe35b9b24, 0xad92774c, <...snip...> , 0x38d6e6c9]
mlockall = [30, 34, 34, 34, 24, 24, 24, 42, 42, 42, 42, 30, <...snip...>, 24, 42]
buffer_3968 = []
for i in range(16):
    buffer_3968.append([pivot[i*2], pivot[i*2+1], mlockall[i]//2])

# Define chmod to so it'll work the same as in the binary. Based on sub_804C19C
def chmod(buffer_3968, next_dword):
    sum = buffer_3968[0] + next_dword & 0xffffffff
    v3 = (sum >> (buffer_3968[2] & 0x1f)) | (sum << (-(buffer_3968[2] & 0x1f) & 0x1f)) & 0xffffffff
    return v3 ^ buffer_3968[1] & 0xffffffff

# Array from 0x81A5100
desired_result = [0x260A064, 0x7D878AEA, 0x0E47CE96C, 0x0C2D3F82, 0x0EBB5B78C, 0x424F35CF, 0x492BAD4F, 0x0E07C2820]

flag = b""

# decrypt_block
for j in range(0, 8, 2):
    next_dword = desired_result[j]
    current_dword = desired_result[j+1]

    for i in range(16):
        xored = next_dword
        next_dword = current_dword
        current_dword = xored ^ chmod(buffer_3968[15-i], current_dword) & 0xffffffff

    flag += p32(current_dword)
    flag += p32(next_dword)

print(flag)
Running this script, we’ll get '4nD_0f_De4th_4nd_d3strUct1oN_4nd'. looks like we reversed the process correctly and we got the rest of the flag. But oh no, seems to me that the flag is not complete yet.
Stage 3
Getting to the Third Check
Let’s take a deep breath and continue to analyze the flow and see what’s going on.
We’ll see where the execution flow takes us by going back to child1_main, to the code that handles truncate.
case 0x4A51739A:              // truncate
  copy_from_pid(parent_pid, parent_regs.ebx, (int *)&huge_buffer, 40000);
  for ( i = 0; i <= 39999 && *(_BYTE *)(i + 0x804C640); ++i )
  {
    child1_16000_buff[i] = *(_BYTE *)(i + 0x804C640);
    if ( equal_bytes_count == -1 && child1_16000_buff[i] != *(_BYTE *)(i + 0x81A5100) )
      equal_bytes_count = i;
  }
  equal_bytes_count = zero(0xA4F57126, input_buffer, equal_bytes_count);
  parent_regs.eax = equal_bytes_count;
  ptrace(PTRACE_SETREGS, parent_pid, 0, (int)&parent_regs);
  break;
Having counted all the equal bytes child1 will now trigger a SIGSEGV again and will hand control over to child2, passing the relevant magic number, our input_buffer, and the equal_bytes_count. Looking at the relevant code in child2_main, we see something a bit strange.
case 0xA4F57126:
  child1_regs.eax = arg2;
  if ( arg2 != -1 )
  {
    copy_from_pid(child1_pid, arg1, (int *)input_buffer, 62);
    if ( strncmp(s1, "@no-flare.com", 0xDu) )
      child1_regs.eax = -1;
  }
Seems like the rest of the flag is compared to "@no-flare.com", but at this point, I don’t think anyone solving this challenge can believe this. It’s yet another troll the challenge’s author has planted in it. We need to try and think of a way the challenge author changes the execution flow of the code dynamically since this code clearly doesn’t make sense. If you remember, not so long ago child1_main was copying a 40000 bytes buffer into a 16000 bytes one. Sounds like this thing can mess things up on our stack, and possibly subverting the original execution flow. The easiest way to see whether this is the case or not is to simply debug it and see with your own eyes. We showed how we can use the debugging method to get the second stage of the flag so we can do this here as well.
We’re interested in seeing what happens in the basic block at 0x08049855, right after our potential buffer overflow. Let’s put a breakpoint in this address and execute the patched version of the binary as we did before. Similar to the previous execution, the program will hang in the EB FE and we can use a debugger to attach to it. Then, set the instruction pointer to one of the nop operations after the infinite loop and click Continue.
In your terminal, enter the correct two parts of the flag, and wait for a few minutes to give the challenge enough time to get to our loop and stop at the breakpoint (few minutes). Finally, the program will stop at 0x08049855.
.text:08049855 mov     eax, offset input_buffer
.text:0804985A sub     esp, 4
.text:0804985D push    [ebp+equal_bytes_cunt]
.text:08049860 push    eax
.text:08049861 push    0A4F57126h
.text:08049866 mov     eax, [ebp+zero]
.text:08049869 call    eax
Let’s examine the variables on the stack to see it we were correct. ebp+equal_bytes_count is still 32 as expected, but if we take a look at ebp+zero we see that it’s not zero!
[stack]:FFFEBEF0 dd offset unk_8053B70
It points to an address in the code section that we haven’t seen before. We will continue stepping-into until we call this new code at 0x8053b70. We can hit C and then P to define this as code and then as a function and we’ll rename this to our shellcode_start.
Analyzing the Shellcode
This function will simply call another function, passing the arguments as they are.
void __cdecl __noreturn shellcode_start(int a1, int a2, int a3)
{
  sub_805492E(a1, a2, a3);
}
We have quite a lot going on in sub_805492E. We’ll refer to it as the shellcode_main and start examining parts of the code.
v12 = shellcode_start;
v13 = dword_81A5280;
sub_8054C5C(0, dword_81A5280, 12, v3);
Since we’re dynamically debugging this, it’s easy to see that dword_81A5280 contains the parent PID and that v12 contains the base of the shellcode so let’s rename accordingly. The first function call we have is to sub_8054C5C which seems to be simply a wrapper around ptrace but it’s switching the arguments around to confuse us. Let’s rename that to calls_ptrace and keep in mind the new parameter order.
int __usercall calls_ptrace@<eax>(void *addr@<ecx>, pid_t pid@<edx>, int request@<eax>, void *data)
{
  return sys_ptrace(request, pid, addr, data);
}
if ( a3 != 32 )
{
parent_regs.eax = -1;
calls_ptrace(0, parent_pid, PTRACE_SETREGS, &parent_regs);
calls_ptrace(0, parent_pid, PTRACE_DETACH, 0);
sub_80540CB();
}
Then, if the third argument is tested to be 32, and if that’s not the case, child1 will return -1 in eax, detach from the parent, and will call sub_80540CB that’ll simply exit. These are the arguments we get from child1_main:
equal_bytes_count = zero(0xA4F57126, input_buffer, equal_bytes_count);
So the third argument is the number of bytes equal between our decrypted input and the desired bytes we saw in 0x81A5100. This is basically a test to see whether the second part of the flag was indeed correct. While we’re at it, we’ll also rename the second argument of our shellcode to input_buffer. Now that that’s out of our way, time to get into the main logic of the third stage. But before that, when you get code dynamically generated while you’re debugging, it’s always a good idea to take a memory snapshot in IDA so you’ll have this stored in your idb statically. Simply going to Debugger→Take memory snapshot will do, just make sure the segment you’re new code is at is included.
Now, we can use FindCrypt again to see if we got some new crypto constants here in this new piece of code, so we’ll Ctrl+Alt+F:

Indeed we get 3 hits, that identify data as Big_Numbers3. If we take a look at the YARA rule that triggers this, we can see that it’s simply a string of a 64-byte number. We’ll keep that in mind.
rule Big_Numbers3
{
	meta:
		author = "_pusher_"
		description = "Looks for big numbers 64:sized"
		date = "2016-07"
	strings:
        	$c0 = /[0-9a-fA-F]{64}/ fullword wide ascii
	condition:
		$c0
}
Quickly browsing around the functions that are called in shellcode_main, we see a few things that will help us later:
sub_805409Fis a wrapper function that moves around the arguments and just callsopensub_80540B5does the same forreadsub_8054091is just aclosewrappersub_8054C75looks a lot like a function we already analyzed -copy_to_pidwhich usesptraceto copy bytes to the process specified.- There are a few functions that get the base of our shellcode + an offset. This is usually a method that shellcode writers use to hold strings. We’ll examine the contents of those offsets and write a comment in the appropriate locations.
Needles to say, we’ll rename these functions accordingly for easier analysis. Let’s have a high-level view of the code we have now:
void __cdecl __noreturn shellcode_main(int a1, int input_buffer, int equal_bytes_count)
{
  shellcode_base = 0x8053B70;
  parent_pid = ::parent_pid;
  calls_ptrace(0, ::parent_pid, PTRACE_GETREGS, &parent_regs);
  if ( equal_bytes_count != 32 )
  {
    parent_regs.eax = -1;
    calls_ptrace(0, parent_pid, PTRACE_SETREGS, &parent_regs);
    calls_ptrace(0, parent_pid, PTRACE_DETACH, 0);
    calls_exit(0);
  }
  sub_80544E2(v12);
  sub_80544E2(v15);
  sub_80544E2(v11);
  sub_8054447(v7, shellcode_base + 0x12A6, 64); // d1cc3447d5a9e1e6adae92faaea8770db1fab16b1568ea13c3715f2aeba9d84f
  sub_8054447(v8, shellcode_base + 0x1224, 64); // c10357c7a53fa2f1ef4a5bf03a2d156039e7a57143000c8d8f45985aea41dd31
  sub_8054447(v5, shellcode_base + 0x11E3, 64); // 480022d87d1823880d9e4ef56090b54001d343720dd77cbc5bc5692be948236c
  sub_8054447(v10, shellcode_base + 0x11E3, 64);// 480022d87d1823880d9e4ef56090b54001d343720dd77cbc5bc5692be948236c
  sub_8054447(v6, shellcode_base + 0x1265, 64); // d036c5d4e7eda23afceffbad4e087a48762840ebb18e3d51e4146f48c04697eb
  qmemcpy(v12, (const void *)(input_buffer + 48), 0x18u);
  v3 = calls_open(0, 0, (char *)(shellcode_base + 0x11D6));// /dev/urandom
  calls_read(0x20u, v15, v3);
  sub_80543CA((int)v15, (int)v7, (int)v16, (int)v9);
  calls_close(v3);
  sub_805422A((int)v15, (int)v9);
  sub_8054533((int)v8, (int)v15, (int)v7, (int)v11);
  sub_805422A((int)v15, (int)v9);
  sub_8054533((int)v10, (int)v15, (int)v7, (int)v13);
  sub_80546E1((int)v12, (int)v11, v15);
  sub_80543CA((int)v15, (int)v7, (int)v16, (int)v14);
  memset(v17, 0, sizeof(v17));
  sub_8054882((int)v13, (int)v17, 1024);
  memset(v17, 0, sizeof(v17));
  sub_8054882((int)v14, (int)v17, 1024);
  if ( !sub_8054251((int)v5, (int)v13) && !sub_8054251((int)v6, (int)v14) )
  {
    *(_BYTE *)(input_buffer + 0x48) = 0;
    copy_to_pid_0(parent_pid, (char *)dword_81A57C0, (void **)input_buffer, (int)&shellcode_base, 0x49);
    parent_regs.eax = 32;
    calls_ptrace(0, parent_pid, PTRACE_SETREGS, &parent_regs);
    calls_ptrace(0, parent_pid, PTRACE_DETACH, 0);
    calls_exit(0);
  }
  parent_regs.eax = -1;
  calls_ptrace(0, parent_pid, PTRACE_SETREGS, &parent_regs);
  calls_ptrace(0, parent_pid, PTRACE_DETACH, 0);
  calls_exit(0);
}
- First, we have is the test to see whether the previous part of the flag was correct. We already passed that.
- Then we have a few functions that get the BigNumber strings we saw, alongside a local variable and
64which is probably the size in bytes. - Later, the code seems to read from
/dev/urandom, and have quite a few function calls that seem to modify the local variables. - Finally, we have an if statement, which seems to operate on our local variables. If the condition is met, then we return 32 (which is what the parent expects as the success value, and we exit. If the condition is not met, then we return
-1and exit. Looks like we need this condition to be met.
Taking a look at the function in the condition - sub_8054251, it looks like it compares the two arguments it gets, and this makes sense.
int __usercall sub_8054251@<eax>(_DWORD *a1@<eax>, _DWORD *a2@<edx>)
{
  v2 = 32;
  while ( 1 )
  {
    --v2;
    if ( a1[v2] > a2[v2] )
      return 1;
    if ( a1[v2] < a2[v2] )
      break;
    if ( !v2 )
      return 0;
  }
  return -1;
}
We have our input affect some of the local variables and the result of this modification is then compared with a fixed value.
Another function that looks worthy of understanding is sub_8054447. It gets a local variable, a pointer to a big number string, and a size of 64.
_DWORD *__usercall sub_8054447@<eax>(_DWORD *a1@<eax>, int a2@<edx>, int a3@<ecx>)
{
  result = sub_80544E2(a1);
  v5 = a3 - 8;
  v6 = 0;
  while ( v5 >= 0 )
  {
    v7 = (unsigned __int8 *)(v5 + a2);
    v8 = 0;
    for ( i = 0; i < 8; ++i )
    {
      v10 = v7++;
      v11 = *v10;
      if ( v11 >= '0' && v11 <= '9' )
      {
        v11 -= '0';
      }
      else if ( v11 >= 'a' && v11 <= 'f' )
      {
        v11 = v11 - 'a' + '\n';
      }
      else if ( v11 >= 'A' && v11 <= 'F' )
      {
        v11 = v11 - 'A' + '\n';
      }
      v8 = v11 & 0xF | (16 * v8);
    }
    result = &a1[v6];
    *result = v8;
    v5 -= 8;
    ++v6;
  }
  return result;
}
It first calls sub_80544E2 which seems to just zero the memory at the local variable and then seems to decode the hex string it got in the second argument. This simply looks like a function that gets a big number string and then converts it into an actual big number in memory.
This is one crucial point where experienced reverse engineers differentiate themselves from inexperienced ones. The most obvious way to tackle this problem at hand is to simply reverse engineer every function we see here that modifies our local variables, understand the logic behind it, and finally write an algorithm that will reverse this process and will get us the rest of the flag from the desired result. This is what inexperienced reversers will probably do; it totally works and there’s no shame with that. Having said that, there is a more efficient way to do this. Experienced reversers may look at this code and say “Huh, looks like we have quite a few functions that handle this unique data type, we’re on the final stretch of this challenge, and we already know this data type (big numbers); there is an option that our dear challenge author didn’t write this code from scratch, but perhaps they used some library / open-source code”. With this assumption in mind, they may do the following:

The first result written in C seems interesting. Scrolling around the code, this function seems like it could potentially be the source version of the code we saw in sub_8054447. In order to understand whether this is the library that has been used here, we need to try and match functions from our challenge to functions in tiny-bignum-c.
Let’s look at sub_80544E2 for example (which is called from the function that converts a string to a big number):
_DWORD *__usercall sub_80544E2@<eax>(_DWORD *result@<eax>)
{
  v1 = result;
  for ( i = 0; i < 32; ++i )
  {
    result = &v1[i];
    *result = 0;
  }
  return result;
}
Looks like this function from tiny-bignum-c:
void bignum_init(struct bn* n)
{
  require(n, "n is null");

  int i;
  for (i = 0; i < BN_ARRAY_SIZE; ++i)
  {
    n->array[i] = 0;
  }
}
Seems to be like this is the library the author used. What we need to do now is to go over the functions called in shellcode_main and match them to this tiny-bignum-c project functions. A few comparisons and function renaming later, we get the following code:
bignum_init(input_bignum);
bignum_init(bignum_random);
bignum_init(v11);
bignum_from_string(bignum_1, shellcode_base + 0x12A6, 64);// d1cc3447d5a9e1e6adae92faaea8770db1fab16b1568ea13c3715f2aeba9d84f
bignum_from_string(bignum_2, shellcode_base + 0x1224, 64);// c10357c7a53fa2f1ef4a5bf03a2d156039e7a57143000c8d8f45985aea41dd31
bignum_from_string(bignum_3, shellcode_base + 0x11E3, 64);// 480022d87d1823880d9e4ef56090b54001d343720dd77cbc5bc5692be948236c
bignum_from_string(bignum_3_copy, shellcode_base + 0x11E3, 64);// 480022d87d1823880d9e4ef56090b54001d343720dd77cbc5bc5692be948236c
bignum_from_string(bignum_4, shellcode_base + 0x1265, 64);// d036c5d4e7eda23afceffbad4e087a48762840ebb18e3d51e4146f48c04697eb
qmemcpy(input_bignum, (const void *)(input_buffer + 48), 0x18u);
file_urandom = calls_open(0, 0, (char *)(shellcode_base + 0x11D6));// /dev/urandom
calls_read(0x20u, bignum_random, file_urandom);
bignum_divmod(bignum_random, bignum_1, v16, v9);
calls_close(file_urandom);
bignum_assign(bignum_random, v9);
sub_8054533(bignum_2, bignum_random, bignum_1, v11);
bignum_assign(bignum_random, v9);
sub_8054533(bignum_3_copy, bignum_random, bignum_1, bignum_result_1);
bignum_mul(input_bignum, v11, bignum_random);
bignum_divmod(bignum_random, bignum_1, v16, bignum_result_2);
memset(v17, 0, sizeof(v17));
bignum_to_string(bignum_result_1, v17, (_DWORD *)0x400);
memset(v17, 0, sizeof(v17));
bignum_to_string(bignum_result_2, v17, (_DWORD *)0x400);
if ( !bignum_cmp(bignum_3, bignum_result_1) && !bignum_cmp(bignum_4, bignum_result_2) )
{
  *(_BYTE *)(input_buffer + 0x48) = 0;
  copy_to_pid_0(parent_pid, (char *)dword_81A57C0, (void **)input_buffer, (int)&shellcode_base, 0x49);
  parent_regs.eax = 32;
  calls_ptrace(0, parent_pid, PTRACE_SETREGS, &parent_regs);
  calls_ptrace(0, parent_pid, PTRACE_DETACH, 0);
  calls_exit(0);
}
Unfortunately, we couldn’t find a match for sub_8054533. In addition, looks like the challenge uses 64 bytes of random data from /dev/urandom. This doesn’t make much sense since the calculation needs to be consistent across executions, since there should be one flag for all of them. We’ll keep those two facts in mind while analyzing the rest of the code.
Reversing the Process
After debugging this process we can notice a few facts:
The first comparison
bignum_cmp(bignum_3, bignum_result_1)always returns true, so we’ll only have to worry about the second one.sub_8054533doesn’t seem do to something that’s relevant for us, only assigning the first bignum argument to the fourth bignum argument.The random bytes don’t affect the result, since their being overwritten with another bignum:
sub_8054533(bignum_2, bignum_random, bignum_1, v11); // v1 = bignum2
bignum_mul(input_bignum, v11, bignum_random);
From the tiny-bignum-c source code, we learn that
bignum_divmod(a, b, c, d)putsa%bindanda/binc
Now we’ll focus on the second check, which is affected by the rest of our flag. The first thing we already know is that the result of the whole process stored in bignum_result_2 should be equal bignum4 (0xd036c5d4e7eda23afceffbad4e087a48762840ebb18e3d51e4146f48c04697eb). Our input is copied into input_bignum and the process starts. Here are the stages:
Our input is multiplied with
v11which contains the same value asbignum2as we already saw. The result is inserted intobignum_randombignum_mul(input_bignum, v11, bignum_random);bignum_result_2is a divmod result ofbignum_randomandbignum_1bignum_divmod(bignum_random, bignum_1, v16, bignum_result_2);Finally,
bignum_result_2is compared tobignum4if ( !bignum_cmp(bignum_3, bignum_result_1) && !bignum_cmp(bignum_4, bignum_result_2) )
So essentially the equation looks like this:
(input_bignum * bignum2) % bignum1 = bignum4
We’ll use Python (>3.8) to reverse this and get the input_bignum, after that we’ll convert this to ascii:
bignum4 = 0xd036c5d4e7eda23afceffbad4e087a48762840ebb18e3d51e4146f48c04697eb
bignum2 = 0xc10357c7a53fa2f1ef4a5bf03a2d156039e7a57143000c8d8f45985aea41dd31
bignum1 = 0xd1cc3447d5a9e1e6adae92faaea8770db1fab16b1568ea13c3715f2aeba9d84f

print(unhex(format(bignum4 * pow(bignum2, -1, bignum1 ) % bignum1 , 'x'))[::-1])

# Results:
# b'_n0_puppi3s@flare-on.com'
Hooray! Putting all the parts together we get the flag - w3lc0mE_t0_Th3_l4nD_0f_De4th_4nd_d3strUct1oN_4nd_n0_puppi3s@flare-on.com.
Inserting this to the challenge finally yields the winning message:
$ ./break
welcome to the land of sunshine and rainbows!
as a reward for getting this far in FLARE-ON, we've decided to make this one soooper easy

please enter a password friend :) w3lc0mE_t0_Th3_l4nD_0f_De4th_4nd_d3strUct1oN_4nd_n0_puppi3s@flare-on.com

hooray! the flag is: w3lc0mE_t0_Th3_l4nD_0f_De4th_4nd_d3strUct1oN_4nd_n0_puppi3s@flare-on.com
Summary
This challenge contained quite a lot of learning opportunities and required thinking outside the box. This was probably one of the best challenges we’ve had the pleasure of solving — ever. We tried to show different approaches that you might find useful in future challenges. We hope that you learned from this writeup and enjoy reading it as much as we enjoyed writing it.
Appendix
String decryption script